Arduino Based Door Lock System With Password
Arduino Based Door Lock System With Password
An Arduino Based Door Lock System is a project where you can secure your doors with a password. Traditional lock systems which are using mechanical locks are replaced by modern technologies. These techniques are electrical and highly intelligent. These systems are also very efficient than older locks. We can use the door unlocking system as an automated room appliance. Like we open the door and the light and fan of the room turn on.
In this project, we are going to build an Arduino based door lock system with a password feature. This project also provides the control to actuating the load. This system is very easy to use like only with a keypad you can operate it.
In this present day, this system is used to protect secure areas. Where those people can only enter who have passwords or permission to enter. After anyone enters the room the doors locked again. When any other arrives, the system asks for a password. If this person enters the wrong password the doors remain closed.
Project
Arduino Based Door Lock System
Circuit Diagram
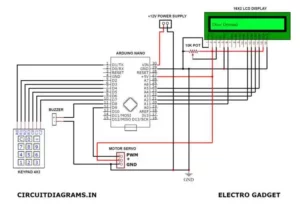
Arduino Based Door Lock System Circuit Diagram
Components Required
Connection of Arduino Based Door Lock System
Now we are going to explain the circuit diagram of the Arduino based door lock system. At first, we show you the connection between the keypad and Arduino. We used here a 4×3 keypad. Connect all the pins of the keypad to the D1, D2, D3, D4, D5, D6 and D7 pin of the Arduino respectively.
Then we take a servo motor and connect the PWM pin with the D9 pin (PWM Output) of the Arduino. Now the positive part of the buzzer needs to be connected to the D10 pin of Arduino and the negative part will be grounded.
After completing these connections, we started to connect the LCD. Connect pin 2 and pin 15 to the VCC. Then connect pins 4, 6, 11, 12, 13 and 14 of the LCD to the A0, A1, A2, A3, A4 and A5 pin of the Arduino. Connect pin 1, 3, 5, 16 of the LCD display to the ground.
PCB Design
For removing messy wiring and give a clean look, I designed a PCB prototype for this project. It is also helpful for troubleshooting that runs great without any errors. To design this PCB board, I used EasyEDA as it is too easy to use. For ordering PCB for this, I prefer PCBWay.
Gerber file for Arduino Based Door Lock System Gerber.
You can view the Gerber file from here Gerber File Viewer.
PCB View
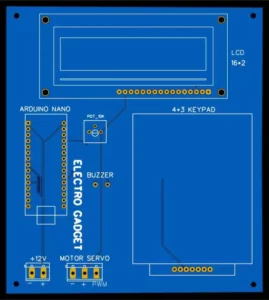
2D View
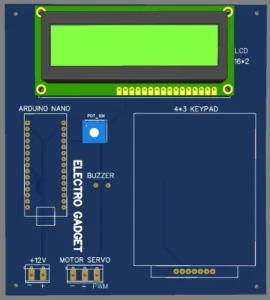
Arduino Based Door Lock System 3D View
Monthly Submission for
Great opportunity for showing your creativity in electronics right now. Zbotic Open Source Community is a platform for sharing creative electronic projects and insightful knowledge for global project makers.
You can express your own ideas about electronics and also receive feedback from the community that is ready for you! Whenever you have some useful and practical ideas on how to design or develop an electronic project, or anything that you think should be discussed at Zbotic. By writing articles on your own unique ideas, you can earn reward points basis on your project as well as earn money. You are always welcome to post articles about electronic projects in their community. For detailed information just check out this link and start a fresh beginning. Monthly Submission for Zbotic.
How PCB Manufacturing Process Done in Zbotic
Standard quality for any product needs to be maintained using some parameters. Zbotic gives that opportunity by quality control in designing and manufacturing. At first, they ensure accuracy, clarity, validity of the PCB files that we sent to them.
Then all the boards will go through the most stringent tests other than the basic visual check. They adopt most of the testing and inspecting equipment used in the industry, such as Flying Probe Tester, X-Ray Inspection Machine, Automated Optical Inspection (AOI) Machine. Zbotic are having 50+ new engineers on the daily basis around the world using PCBs for their work, who trust for their reliable quality. They produce high-quality pink, orange, grey, even transparent solder mask. Moreover, according to people needs, they can also provide Black core PCB. Check it out for a High-Quality PCB solder mask. There are some pictures below of the new colours of solder musks.
Features of Zbotic
PCB Prototyping & Manufacturing: Zbotic produces FR-4 and Aluminum boards and advanced PCBs like Rogers, HDI, Flexible and Rigid-Flex boards, at a very reasonable price. Just check this Instant Quote to order premium PCBs for your hobby projects.
PCB Assembly: It not only offers PCB Prototyping but also offers PCB Assembly service. You can order a full PCB board with attached components by uploading your file. SMT & THT assembly starts from only 30$ including free stencil and worldwide shipping. The components can be sourced and provided by Zbotic, or by clients themselves.
Open Source Community: It not only offers PCB Prototype & Assembly service but also gives opportunities to students for sponsorships. I think this is so great. They feature their projects on the website also.
3D Printing & CNC: It also produces Rapid Prototyping like 3D printing, CNC Machining, Sheet Metal Fabrication, and Injection Molding. The quality of the product is too premium and reliable. And also the best part is that you will receive your order within a minimum of 3 days.
Zbotic Store: More boutique gift modules are waiting for you to discover, giving your creativity wings. You can order all types of electronic equipment, components and many more with exciting offers. Go with the link and buy your needs, Zbotic Store.
Services: Zbotic offers great servicing of their products. It takes only 3 to 15 days according to courier service to deliver your products. Also, it has a live support facility. Whenever you have any problems, you can always reach a live customer service person to respond to your emails or messages. They have the “Return and Refund” principle, for every unusable board caused by Zbotic, they will rebuild and refund the order soon.
Guide for Ordering PCB From Zbotic
Video Soon How to buy?
Working Principle of Arduino Based Door Lock System
For my purpose, I used a random password like “1234” by using the keypad.
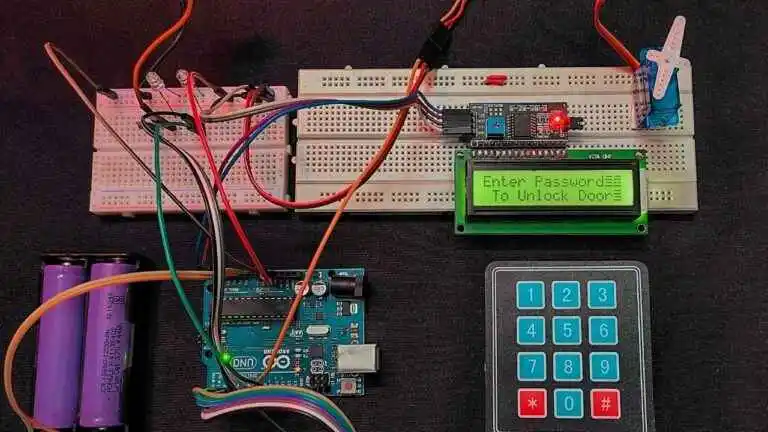
The working principle is so simple. You just need to enter the password through the keypad provided. If the password is matched with the Arduino, it sends a signal to the servo and the servo rotate 180 degrees and then the door will open. Also, the LCD display shows a message “Access Granted”.
But if the password does not match. The Arduino does not send any signal to the motor and the door remains closed. This time the LCD display shows “Password Incorrect, Dismiss”. The alarm is beep when any of the keys are pressed. You can change all these messages anytime from the code.
Applications of Arduino Based Door Lock System
- This circuit can be used as a door lock like keylocks.
- It can be used at highly secure places to secure important documents.
- With some modifications, this project can be used as a password-based home appliances system.
Advantages of Arduino Based Door Lock System
- This project is very simple.
- The components are very common.
- Less power consumption.
- It is a very simple but good security system.
Disadvantages of Arduino Based Door Lock System
- This circuit can not be used remotely.
- By any chance you forget the password, the door can not be opened.
- Can’t possible to manually reset the password using keypad. You need to reupload the code with new password using Arduino IDE software.
Arduino Code
To compile the code to the Arduino, we need some libraries. Download the library for the keypad.h from the below.
| #include <Keypad.h> //#include <LiquidCrystal.h> //For LCD Display Without I2C #include <LiquidCrystal_I2C.h> //For LCD Display With I2C #include <Servo.h> LiquidCrystal_I2Clcd(0x27,16,2); //LiquidCrystal lcd(A0, A1, A2, A3, A4, A5); Servomyservo; intpos=0; constbyterows=4; constbytecols=3; charkey[rows][cols]= { {‘1’,‘2’,‘3’}, {‘4’,‘5’,‘6’}, {‘7’,‘8’,‘9’}, {‘*’,‘0’,‘#’} }; byterowPins[rows]={1,2,3,4}; bytecolPins[cols]={5,6,7}; Keypadkeypad=Keypad(makeKeymap(key),rowPins,colPins,rows,cols); char*password=“9007”;// Type your desired password here intcurrentposition=0; intdecline=10;//Red LED will glow intgrant=11;//Green LED will glow intalarm=8;//Buzzer will beep intinvalidcount=12; voidsetup() { displayscreen(); Serial.begin(9600); pinMode(decline,OUTPUT); pinMode(grant,OUTPUT); pinMode(alarm,OUTPUT); myservo.attach(9);//Servo Attached //lcd.begin(16, 2); //For LCD Display Without I2C lcd.init(); lcd.backlight();//For LCD Display With I2C } voidloop() { if(currentposition==0) { displayscreen(); } intl; charcode=keypad.getKey(); if(code!=NO_KEY) { lcd.clear(); lcd.setCursor(0,0); lcd.print(“Password”); lcd.setCursor(7,1); lcd.print(” “); lcd.setCursor(7,1); for(l=0;l<=currentposition;++l) { lcd.print(“*”); keypress(); } if(code==password[currentposition]) { ++currentposition; if(currentposition==4) { unlockdoor(); currentposition=0; } } else { ++invalidcount; incorrect(); currentposition=0; } } } //OPEN THE DOOR voidunlockdoor() { delay(900); lcd.setCursor(0,0); lcd.println(” “); lcd.setCursor(1,0); lcd.print(“Access Granted”); lcd.setCursor(4,1); lcd.println(“Welcome”); lcd.setCursor(15,1); lcd.println(” “); lcd.setCursor(16,1); lcd.println(” “); lcd.setCursor(14,1); lcd.println(” “); lcd.setCursor(13,1); lcd.println(” “); unlockalarm(); for(pos=180;pos>=0;pos-=5)//Goes from 180 degrees to 0 degrees { myservo.write(pos);//Tell servo to go to position in variable ‘pos’ delay(5); } delay(2000); delay(1000); counterbeep(); delay(1000); for(pos=0;pos<=180;pos+=5)//Goes from 0 degrees to 180 degrees { myservo.write(pos);//Tell servo to go to position in variable ‘pos’ delay(15); currentposition=0; lcd.clear(); displayscreen(); } } //WRONG PASSWORD voidincorrect() { delay(500); lcd.clear(); lcd.setCursor(1,0); lcd.print(“Password”); lcd.setCursor(6,0); lcd.print(“Incorrect”); lcd.setCursor(15,1); lcd.println(” “); lcd.setCursor(4,1); lcd.println(“Dismiss”); lcd.setCursor(13,1); lcd.println(” “); Serial.println(“Password Incorrect You Are Unauthorized”); digitalWrite(decline,HIGH); digitalWrite(alarm,HIGH); delay(3000); lcd.clear(); digitalWrite(decline,LOW); digitalWrite(alarm,LOW); displayscreen(); } voidclearscreen() { lcd.setCursor(0,0); lcd.println(” “); lcd.setCursor(0,1); lcd.println(” “); lcd.setCursor(0,2); lcd.println(” “); lcd.setCursor(0,3); lcd.println(” “); } voidkeypress() { digitalWrite(alarm,HIGH); delay(50); digitalWrite(alarm,LOW); } voiddisplayscreen() { lcd.setCursor(0,0); lcd.println(“Enter Password”); lcd.setCursor(1,1); lcd.println(“To Unlock Door”); } voidarmservo() { for(pos=180;pos<=180;pos+=50) { myservo.write(pos); delay(5); } delay(5000); for(pos=180;pos>=0;pos-=50) { myservo.write(pos); } } //UNLOCK ALARM voidunlockalarm() { digitalWrite(alarm,HIGH); delay(80); digitalWrite(alarm,LOW); delay(80); digitalWrite(alarm,HIGH); delay(80); digitalWrite(alarm,LOW); delay(200); digitalWrite(alarm,HIGH); delay(80); digitalWrite(alarm,LOW); delay(80); digitalWrite(alarm,HIGH); delay(80); digitalWrite(alarm,LOW); delay(80); } voidcounterbeep() { delay(1200); lcd.clear(); //1 digitalWrite(alarm,HIGH); lcd.setCursor(2,15); lcd.println(” “); lcd.setCursor(2,14); lcd.println(” “); lcd.setCursor(2,0); delay(200); lcd.println(“Get In”); lcd.setCursor(4,1); lcd.print(“5”); delay(200); lcd.clear(); lcd.setCursor(2,0); lcd.println(“Get In”); digitalWrite(alarm,LOW); delay(1000); //2 digitalWrite(alarm,HIGH); lcd.setCursor(2,0); lcd.println(“Get In”); lcd.setCursor(4,1); lcd.print(“4”); delay(100); lcd.clear(); lcd.setCursor(2,0); lcd.println(“Get In”); digitalWrite(alarm,LOW); delay(1000); //3 digitalWrite(alarm,HIGH); lcd.setCursor(2,0); lcd.println(“Get In”); lcd.setCursor(4,1); lcd.print(“3”); delay(100); lcd.clear(); lcd.setCursor(2,0); lcd.println(“Get In”); digitalWrite(alarm,LOW); delay(1000); //4 digitalWrite(alarm,HIGH); lcd.setCursor(2,0); lcd.println(“Get In”); lcd.setCursor(4,1); lcd.print(“2”); delay(100); lcd.clear(); lcd.setCursor(2,0); lcd.println(“Get In”); digitalWrite(alarm,LOW); delay(1000); //5 digitalWrite(alarm,HIGH); lcd.setCursor(4,1); lcd.print(“1”); delay(100); lcd.clear(); lcd.setCursor(2,0); lcd.println(“Get In”); digitalWrite(alarm,LOW); delay(1000); //6 digitalWrite(alarm,HIGH); delay(40); digitalWrite(alarm,LOW); delay(40); digitalWrite(alarm,HIGH); delay(40); digitalWrite(alarm,LOW); delay(40); digitalWrite(alarm,HIGH); delay(40); digitalWrite(alarm,LOW); delay(40); digitalWrite(alarm,HIGH); delay(40); digitalWrite(alarm,LOW); lcd.clear(); lcd.setCursor(2,0); lcd.print(“Relocking”); delay(500); lcd.setCursor(12,0); lcd.print(“.”); delay(500); lcd.setCursor(13,0); lcd.print(“.”); delay(500); lcd.setCursor(14,0); lcd.print(“.”); delay(400); lcd.clear(); lcd.setCursor(4,0); lcd.print(“Door Locked”); delay(440); } |

