
1 comment
Comments are closed.


Radiation Detector is an instrument used to detect or identify high-energy particles, such as those produced by nuclear decay, cosmic radiation, or x-ray scans. This instrument is also known as
Radiation Detector is an instrument used to detect or identify high-energy particles, such as those produced by nuclear decay, cosmic radiation, or x-ray scans. This instrument is also known as Geiger counter.
So, without any further waiting, lets get started
Radiation is emission or transmission of energy in form of waves or particles manner. Its typically categorized in ionizing and non ionizing radiation depending on the energy of the radiated particles and the source of the radiation.
For the project, we’ll be referring ionizing radiation only. As the Geiger counter can only detect ionizing radiation. For example ionizing radiation is caused by –
electromagnetic radiation – UV, X-Ray, Gamma Ray (γ).
particle radiation – alpha radiation (α), beta radiation (β), proton radiation and neutron radiation.
Earlier, photographic plates were used to detect radiation as it left trace on the plate when it passes through it. Similar to the X-Ray plates. Cloud chambers were also used to detect alpha radiation.
Nowadays, we used electronic detectors. They also can measure the spin, charge and direction of the particle’s in question.
There are many types of detector, 2 of the famous ones are Gaseous Ionization Detector and the other one is Geiger Counter.
It is a radiation detection instrument used in particle physics to detect the presence of ionizing particles, and in radiation protection applications to measure ionizing radiation
Geiger-Mueller counter, commonly called the Geiger counter is the most commonly used detector. A central wire in between a gas-filled tube at high voltage is used to collect the ionization produced by incident radiation. Although it cannot distinguish between the types of radiation – such as alpha, beta, gamma radiations.
There are 3 types of radiation detected by these detectors are Alpha, Beta, and Gamma radiation.
Alpha particles or double ionized helium nuclei. Basically they are the fast-moving helium atoms. They also have high energy ranging in MeV. But they have low penetration depth; typically a few cm of air or skin due to their large mass
They are fast-moving electrons. They have energies ranging from hundreds of KeV to several MeV. They have better penetration depth due to their comparatively lighter mass. Typically, several feet of air, several millimeters of lighter materials.
They are the stream of photons. Typical energy ranges from Several KeV to Several MeV. They have comparatively very low mass. Thus, possess good penetration depth. Typically, a few inches of lead
Now, with these you should be able to understand about what radiation is and about what we’re working on.
Arduino UNO is a microcontroller board based on the ATmega328P. It has 14 digital I/O pins (of which 6 can be used as PWM outputs), 6 analog inputs, a 16 MHz ceramic resonator, a USB connection, a power jack, and a reset button.
It contains everything needed to support the microcontroller. Just simply connect it to a computer with a USB cable or power it with a AC-to-DC adapter or battery to get started. You can tinker with your UNO without worrying too much about doing something wrong, worst case scenario you can replace the chip for a few dollars and start over again.
Some of the key features of Arduino UNO –
Download or get Arduino IDE from their website/windows store.
After installing Arduino IDE, open it up can copy the following code onto a new sketch.
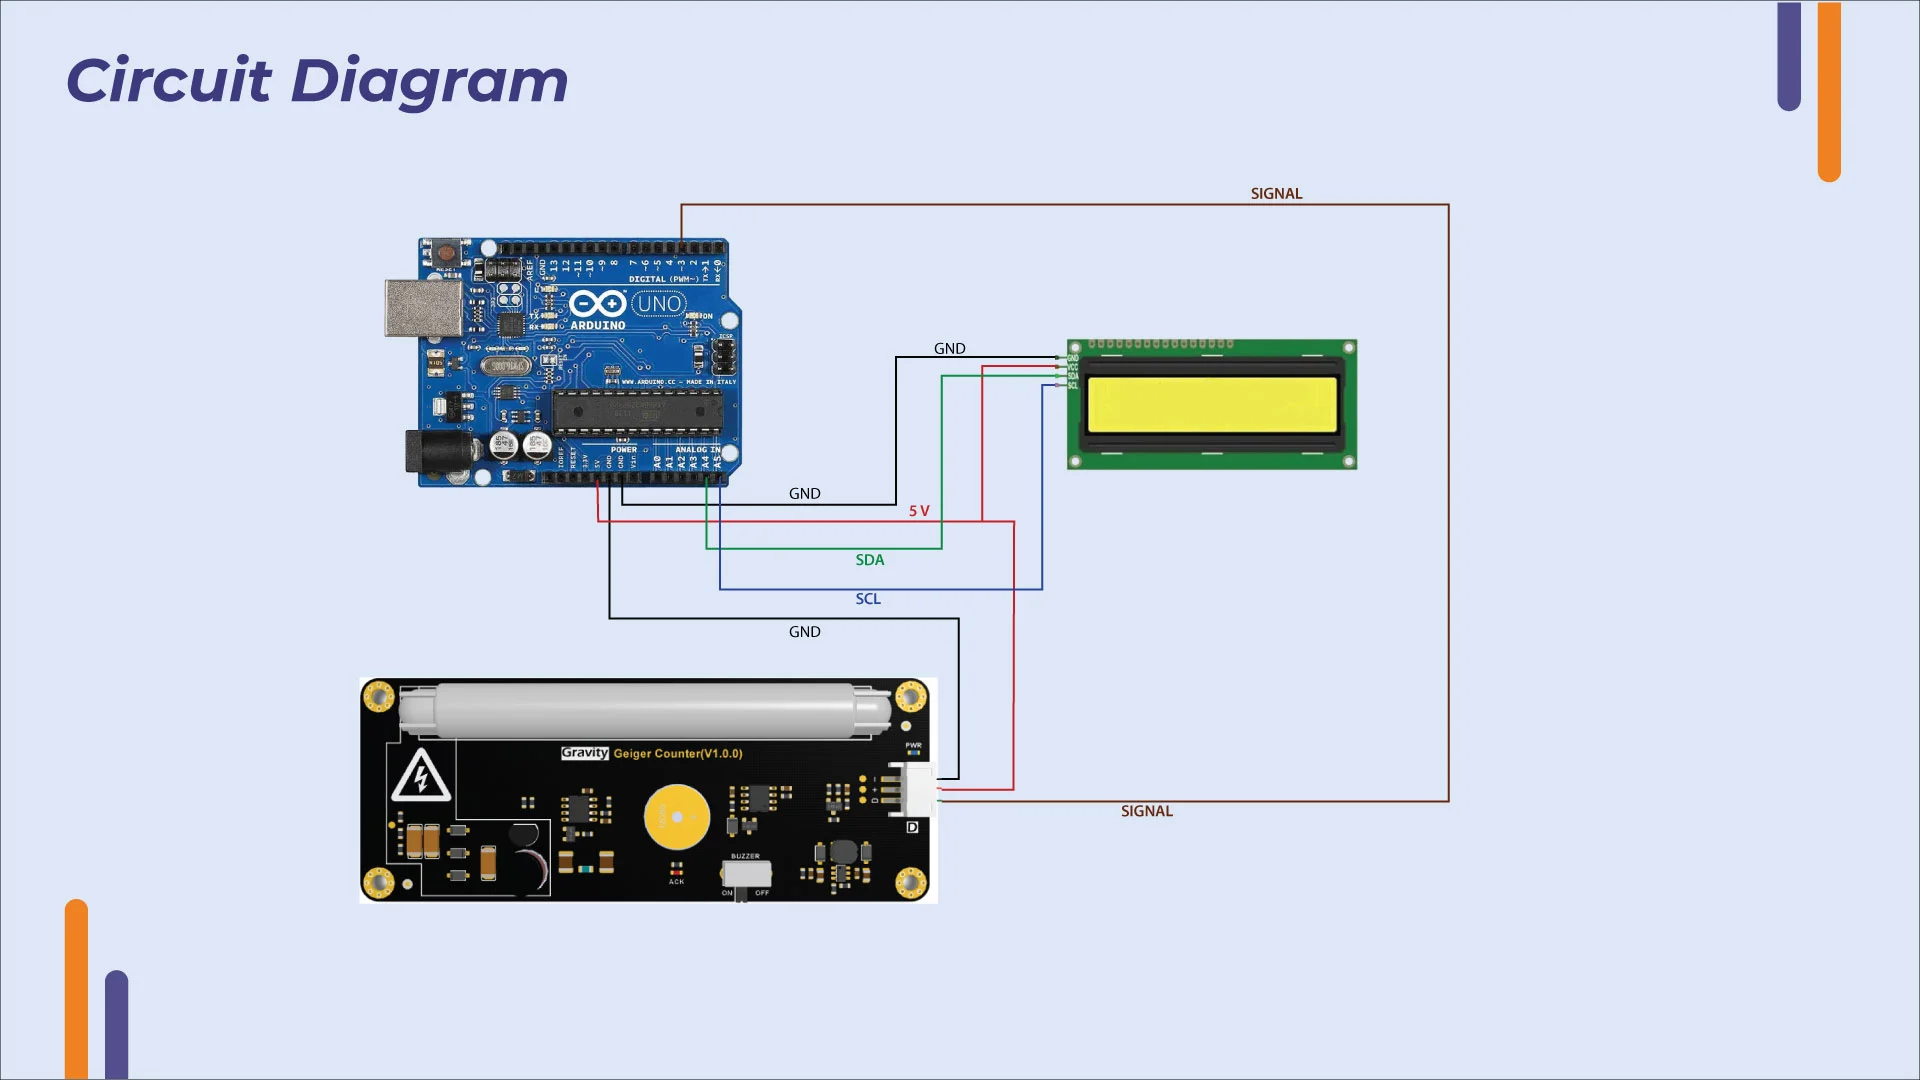
| Arduino Uno | DFRobot Geiger Counter Module |
| +Ve | +5V |
| -Ve | GND |
| pin 3 | Signal |
| Arduino Uno | 1602 LCD Module |
| +Ve | +5V |
| -Ve | GND |
| A4 | SDA |
| A5 | SCL |
Copy the following code and pat it into Arduino IDE and after connecting Arduino UNO to your pc. Before you upload the code, make sure to select the correct port on which Arduino UNO is connected.
It should be automatic in newer IDE’s, but in case it didn’t auto select the PORT, assign the correct port in Tools section of the IDE.
#include <Wire.h>
#include <LiquidCrystal_I2C.h>
#include <DFRobot_Geiger.h>

#if defined ESP32
#define detect_pin D3
#else
#define detect_pin 3
#endif

LiquidCrystal_I2C lcd(0x27,16, 2);
DFRobot_Geiger  geiger(detect_pin);

void setup(){
  Serial.begin(9600);

  lcd.init();
  lcd.backlight();

  geiger.start();
}

void loop(){
  lcd.clear();
  float x= geiger.getCPM();
  Serial.println(x);

  lcd.setCursor(0,0);
  lcd.print("CPM :");
  lcd.setCursor(0,1);
  lcd.print(x);

  //Serial.println(geiger.getnSvh());
  //Serial.println(geiger.getuSvh());
  delay(3000);
}The way this works is that when the module is powered on, it charges the tube upto 400V. When a ionizing radiation passes through the tube, it hits one the gas molecules causing it to create an ion pair and a stray electron which is attracted to the wire in the middle causing a electrical pulse through the wire, which is picked up the IC on the module and thus sending the the data over the I2C lines to the Arduino Uno and out to the display.
If no error has occurred till now, then you’ve successfully made a Geiger Counter using Arduino Uno. But there’s one thing to note – that the Geiger Counter module that we’ve used here isn’t meant for situations where its absolutely necessary to have a proper and certified Geiger Counter.
This should be used for only educational purposes only, and don’t expose yourself to radioactive material’s on purpose. Don’t go out seeking/ or disassemble radioactive parts to find sources. Once the radioactive stuff is in your system, it might have adverse and irreversible effects.
Comments are closed.
An all order above 499
UPI, Debit, Credit, Netbanking
Whatsapp us at +91 9080968234
Support timings:
Mon-Sat 10.00 am to 5.00 pm
Orders more than 1000 INR for free delivery..... COD Orders only available for more than 500 INR purchases only. Dismiss
Hi… Wonderful projects